
By Taylor Kolste
Dating back to at least his early Oregon days, a Y-Cross concept known as “Saints” has been a staple of Chip Kelly’s offense. This was the #1 ran passing concept for both Oregon and the Eagles during Kelly’s tenure there. Here are the stats for “Saints” over Chip Kelly’s last 5 years in coaching: * Passer Rating is based on NFL calculation.
Oregon 2012: 45 for 58, 725 Passing Yards, 16 Touchdowns, 0 Interceptions, 158.3 Passer Rating
Eagles 2013-2015: 39 for 73, 801 Passing Yards, 5 Touchdowns, 2 Tnterceptions, 103.7 Passer Rating
49ers: 8 for 17, 177 Passing Yards, 1 Touchdown, 1 Interception, 84.7 Passer Rating
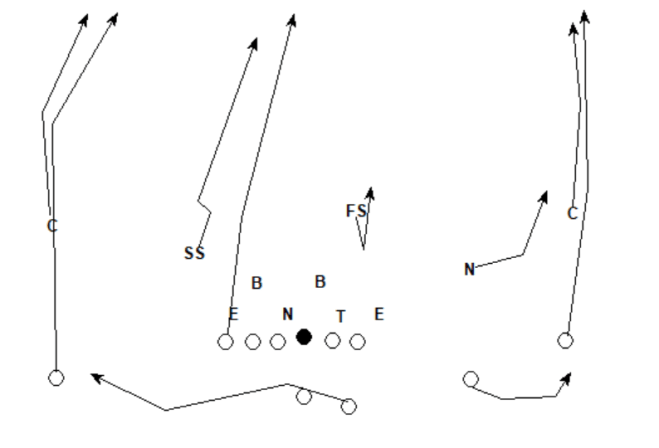
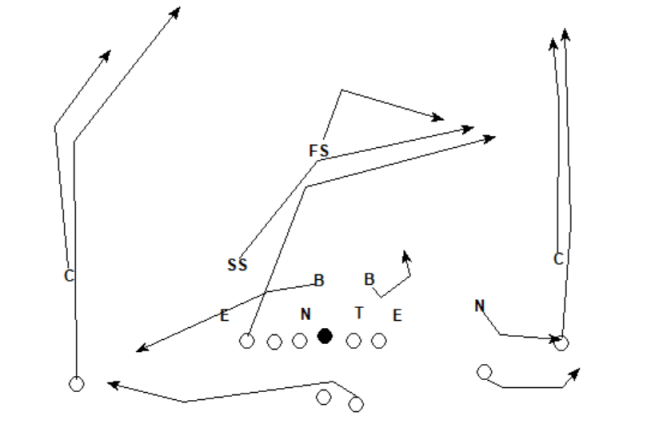
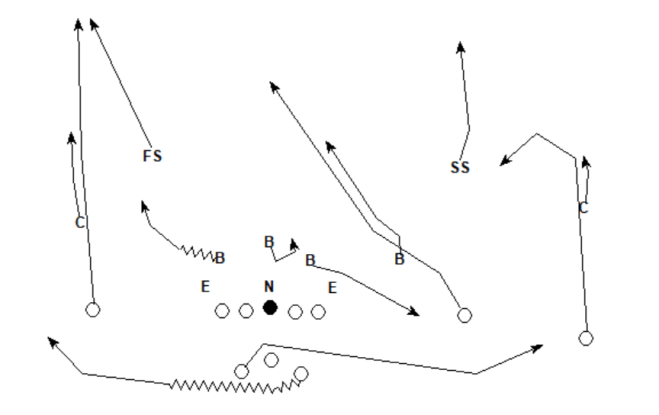
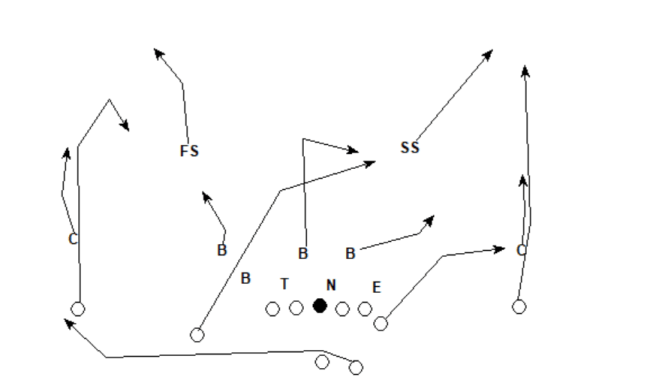
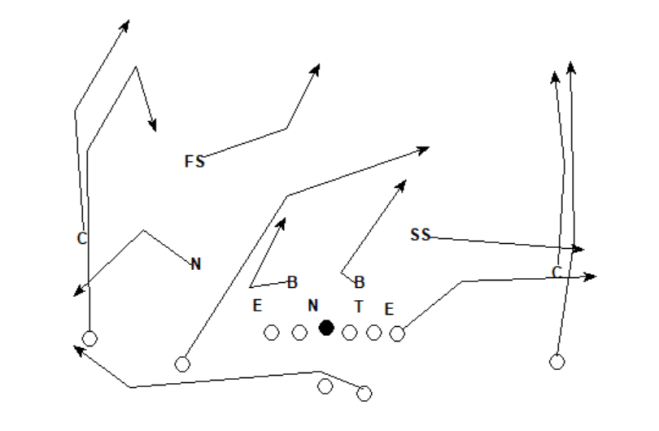
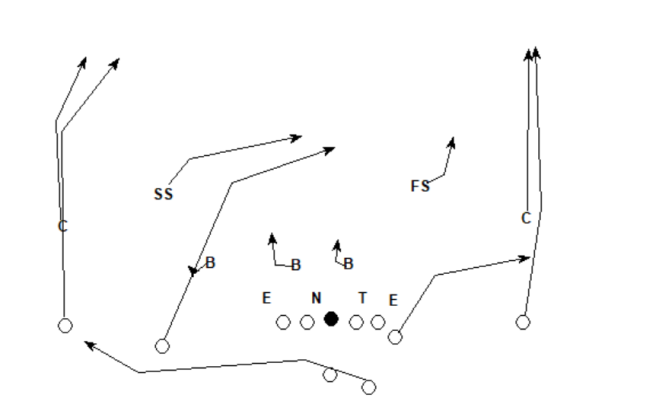
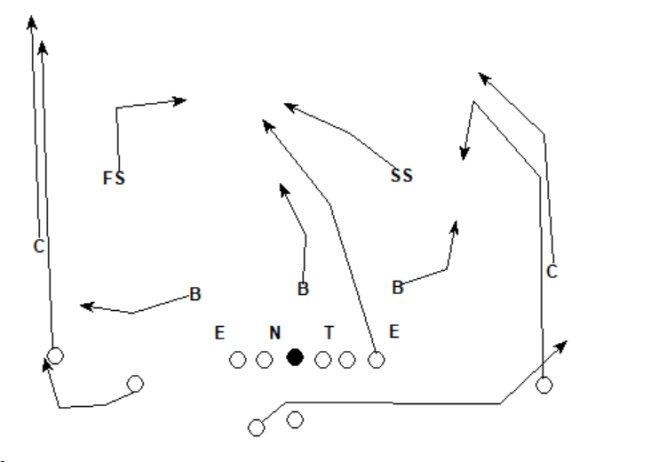
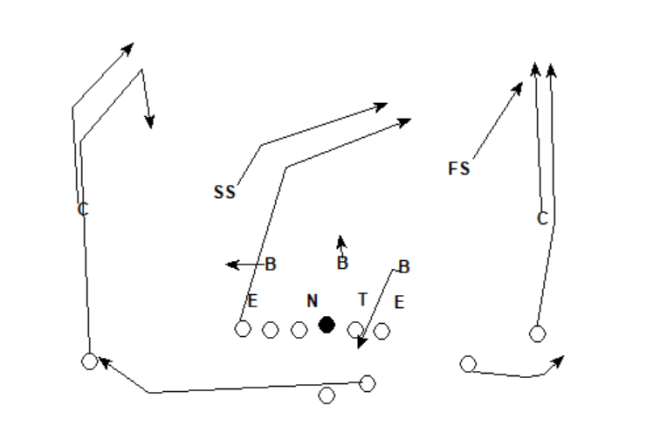
Here is a diagram of the “Saints” concept:

They had a few more ways they could run this concept, but the two shown above are the variations that they ran most frequently. “Saints” was always ran as a play-action concept. They primarily used a mid-zone (Oregon’s term for what most people would consider outside zone) run fake, but could also run it with an inside zone fake as well. This concept was always ran from a 2×2 formation (could motion to 2×2 as well) with 1 receiver on a vertical route and 1 receiver immediately to the flat. The vertical receiver would look to settle in the hole if the corner jumped the flat route. The frontside high-low on this play is primarily designed to create space for the backside of this play, specifically the crossing route. The crossing route was most frequently ran by an in-line tight end, but could also be ran from the slot receiver. The crosser will take the best release available, but it is preferred that he goes underneath the first linebacker (SAM) and then climb over the second linebacker (MIKE) before working across the field. The crossing route has the option to stay vertical if the middle of the field is open. Kelly most frequently called this play with the crosser running from the field to the boundary because it allowed him to cross the field quicker to create a weakside “flood” on the defense. The backside receiver will run a skinny post with the option to convert to a post-curl if he cannot win over-the-top. The running back will stay in protection if the defense brings pressure from the backside, otherwise, he will release to the backside flat.
This play was a pure progression read for the QB. One of the advantages for this play is that the progression will always be the same for the QB no matter the coverage and “flows” naturally from either right to left or left to right. Here is the QB’s progression:
1A/1B: The QB will read his frontside high-low almost simultaneously as he comes off the mesh. The receiver in the flat will be the QB’s hot route in the event that the defense brings frontside pressure.
2: After coming off of his 1A/1B read, the QB will reset his feet to the middle of the field to see if the crosser is open.
3: If the crosser is not open, the QB will then reset to the backside to see if there is space for the backside receiver on his post/post-curl read.
4: If the backside receiver is not open, the running back in the backside flat will be the QB’s checkdown.
I will now go through how this play works versus the four primary coverages that they saw when running “Saints”: Cover 1/Man-Free, Cover 2, Cover 3, and Cover 4/Quarters.
Cover 1:
Versus Cover 1 (man to man coverage with a single high free safety), the ball will go to the crosser or the post/post-curl nearly every time. Even though the offense will usually have a 1 on 1 for the frontside vertical, there are better options to defeat man coverage within this concept so the QB will get off of his 1A/1B read as soon as he sees man shifting his eyes to the crosser.

Often times versus man coverage, the rolled down strong safety in man coverage on the tight end will be influenced by the outside run fake towards him which allows the tight end to gain a few steps on him with his crossing route. Here are a few examples of the crossing route being thrown to versus man coverage:
As I mentioned earlier, the crossing route has the option to stay vertical if the middle of the field is open. In the following example, the free safety is playing closer to the box than normal and is held by the play-action fake. Rather than working across the field in front of the free safety, the tight end stays vertical taking it over the top of the free safety.
If the defender in man coverage is able to stay with the crosser, then the QB will look to his backside receiver to throw either the post or post-curl depending upon whether the receiver is able to win deep on the post. Usually the crosser will occupy, or at least move, the free safety which creates space to throw the post. Here are a few examples of throwing the post versus cover 1:
With the strong safety being pulled across the field by the crosser and the inside linebacker being pulled to the flat by the running back on his swing, there is still space versus man coverage for the outside receiver if he is not able to win deep to curl back into. Here are a few examples of throwing the post-curl versus man coverage:
Cover 2:
Cover 2 (2 deep, 5 under zone) is probably the worst look to run this play against, however it can still be a good play for the offense (just not quite as good as it would be versus other coverages).

Versus cover 2, the corner will sometimes jump the flat route hard, especially when the offense uses a bubble from the slot. Both the outside receiver and the QB should recognize this fast, and the QB will throw the ball immediately off the mesh to the “hole” between the safety and corner. The outside receiver will look to settle before he gets to the safety. Here are a few examples of throwing the hole shot vertical versus cover 2:
If the corner does not jump right away, then the QB will move away from his 1A/1B read looking to the crosser. Versus cover 2, the crossing route will look to take his route high over the middle. With the safeties splitting, this forces the MIKE to account for the middle hole and run with the crosser. If he does not match the crosser, then the offense should have good space down the middle of the field. In the following clip, the defense is playing a quarter-quarter-half coverage, or what some people refer to as cover 6, where the defense plays quarters to one side and cover 2 to the other. Even though the defense is in a cover 4 look to the boundary, they are still playing cover 2 to the field and the backside of the play works out similarly in this clip as it would be if the defense were playing a standard cover 2.
Most of the time, however, one of the 3 linebackers in their hook zone is able to drop underneath the crossing route and close any windows. With the backside safety playing his deep half, the backside receiver will likely run a post-curl as his vertical space is capped. Occasionally versus cover 2, the outside linebacker will be pulled far enough inside by the crossing route, who is attempting to release inside of him, to create a window behind him to throw the post-curl. Here is an example of this:
Most of the time with this concept versus cover 2, the QB will end up working back to the checkdown if the vertical does not come open in the hole right away. Because there is no immediate threat to the backside flat, the backside corner will usually give downfield with the backside route. With the outside linebacker staying underneath the post-curl and the corner dropping, there is decent space to the backside flat for the back. Here are a few examples of throwing the backside swing versus cover 2: (the defense plays tampa 2 in both examples, but the backside picture is still very similar)
Cover 3:
Versus cover 3 (3 deep, 4 under zone), the QB will be able to get off of his 1A/1B read immediately as the defense has 2 defenders in good positions to take away the vertical and flat. As was the case versus cover 1, the ball will likely either go to the crosser, or the backside receiver on his post/post-curl read.
The offense knows that they will be able to take both the corner and flat defender out of the picture with this play versus cover 3. They are then attempting to influence the inside linebacker enough with the outside run fake away to create a window to throw behind him to the crosser. Here are a few examples of throwing the crossing route versus cover 3:
If the inside linebacker is not affected enough by the play fake to open up the crosser, the QB will then look to his backside receiver. As was the case versus cover 1, even if the crosser is covered up by underneath defenders, he usually moves the safety enough to create space to the post. Here are a few examples of throwing the post versus cover 3:
In addition to moving the safety, the crosser usually moves the backside inside linebacker enough to create space behind him in the curl window. With the backside flat defender occupied by the back swinging out the backside, there is a nice window in between the flat defender and hook defender for the backside receiver on his post-curl if the corner is capping his vertical space. Here is an example of throwing the post-curl versus cover 3:
Cover 4:
Cover 4 (4 deep, 3 under match coverage) was the coverage that Oregon saw the most and was also the coverage that this play was best against.
Often times versus quarters, the linebacker responsible for the flat is held by the run-fake, which gives the offense leverage to the flat. This is similar to some RPOs that teams run designed to stress the outside linebacker. If the QB sees the corner dropping and no player expanding or rolling down to the flat as he comes off the mesh, then he will throw the ball to the flat. Here are a few examples of throwing the ball to the flat versus quarters:

If the frontside outside linebacker expands with the flat route, then the QB will reset to the middle of the field for the crosser. The bubble/go action combined with the QB’s eyes staring down those 2 receivers should move the corner, safety, and outside linebacker to create space for the crosser. Normally in quarters, the backside safety would be responsible for any vertical route by the tight end, however he can normally be frozen or influenced some by the outside run fake towards him. Combined with the tight end taking an inside release on the outside linebacker, he can often times be “lost” by the defense as he climbs vertically over the MIKE, who is also usually influenced by the play-fake. Here are a few examples of throwing the crosser versus quarters:
When the crossing route is ran by a slot receiver, it is very unlikely that the safety loses sight of him. However, the offense still has a 1 on 1 that can be advantageous for them if the slot can run away from the safety. Here is an example of throwing the slot cross versus quarters:
If the backside safety is able to keep sight of the tight end on his crossing route, this will create a 1 on 1 for the offense on the backside. If the backside receiver is able to win vertically on his post route, then the play ends up looking similar to the Mills concept with the safety being occupied by #2’s vertical route creating space over the top of him to the post. Here are a few examples of throwing the post versus quarters:

If the backside safety is able to take away the crosser, and the backside receiver cannot win on the post, there is usually a good window versus quarters for the post-curl in between the MIKE and SAM. Here are a few examples of this: (the defense is using a cover 2 scheme to the boundary in each of these clips but the backside of the play still works out the same)
If the QB works back to the post-curl and the outside linebacker is sitting in the curl window, then that means that there will be space for the back in the backside flat. Here are few examples of throwing the backside swing versus quarters:
Pressure:
If the defense brings pressure from the frontside, then the QB will throw hot to the flat. If the defense brings pressure from the backside, then the back will stay in protection.
Here are a few examples of the offense throwing hot to the flat versus boundary pressure:
Tempo
As Noah had mentioned in his Baylor article, using tempo can lead to some busted coverages from the defense. Here are two examples where the offense runs “Saints” twice in a row off of a very fast tempo. A lot of hurry up-no huddle offenses will have a signal telling them to line up as fast as they can and run the play again. In the following clips, both times the defense fails to communicate their coverage correctly leading to a vertical receiver unaccounted for.
Tags
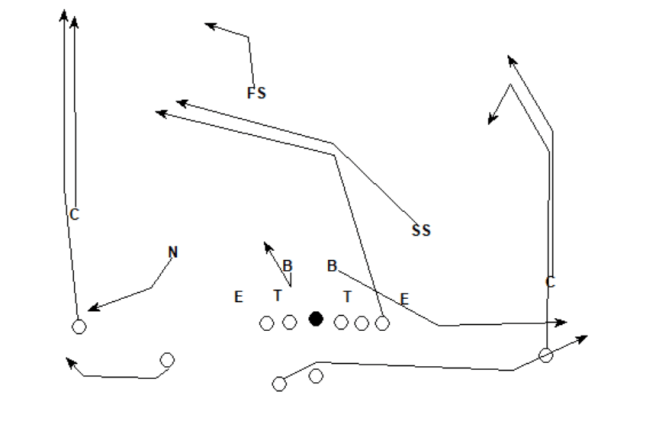
Dual Cross
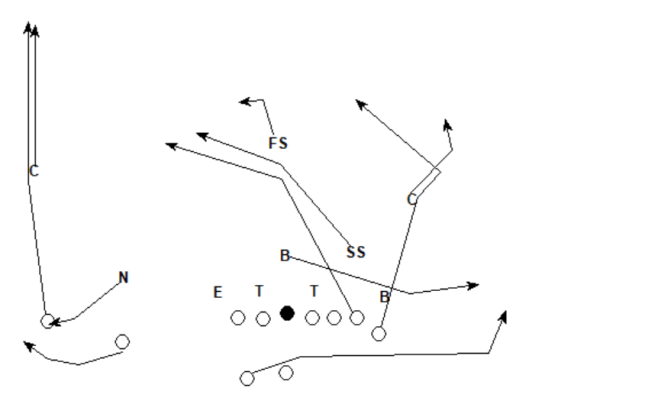
If the defense was playing a lot of man coverage, or just manning up the backside tight end, they could run “Saints” with a second crossing route taking the place of the backside post/post-curl read. The progression is the same for the QB, it’s just now that the backside crossing route replaces the backside post/post-curl read as the QB’s #3 read.

They liked this play when teams were manning the backside tight end versus closed 3×1 formations. If the backside corner runs with the tight end on his crossing route, then open space is created for the frontside slot on his crossing route to the backside of the play. Here are a few examples of the backside cross being thrown on this play:
The QB still goes through his normal progression when using the “Dual Cross” tag. Here are examples of the other reads on this play:
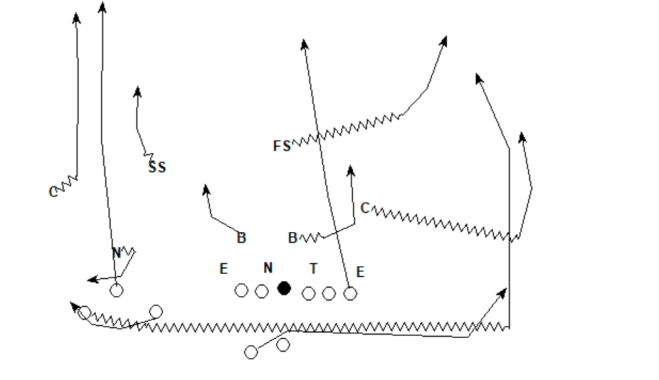
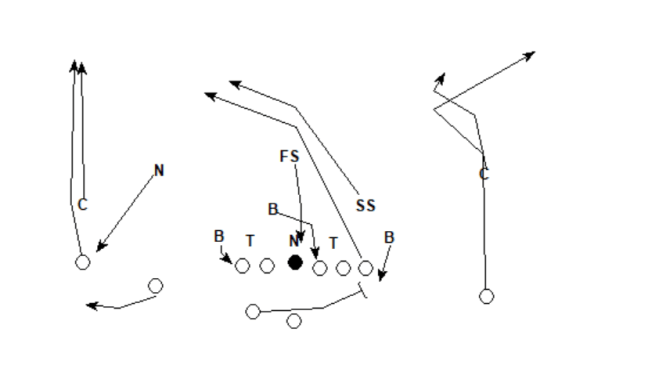
Dbl Posts
By simply changing the backside route, they could make this play more like a Double Posts concept. They would run this from either a 2-tight end set, or with a tight split from the backside single receiver. With the condensed split, the backside receiver will usually already start with inside leverage on the corner based on alignment. He will push outside towards the corner and give a small lean towards the corner trying to get him to open up his hips. He will then break it inside towards the post on sharp break. This post will be thrown as a “bang-post” with the QB throwing the ball on a sharp line as opposed to the normal over-the-top skinny post that they used on this play.
This was a good high red-zone call for them designed to attack a single-high safety. You can see in the following clip that the crosser moves the free safety which opens up space to throw the bang-post behind him (also helps that the defense only had 10 players on this play).
Post Corner
If the corner was cheating inside on the receiver’s initial post break, then the offense could tag a post corner route to the backside receiver. However, they did not use this tag much. I only saw Oregon use this play twice over a 35 game span. Also, neither the Eagles nor the 49ers used this tag.
In the film clip below, you can see the backside corner drive on the receiver’s initial post break putting him in a bad position to re-direct to the corner once the receiver makes his second break. With the defense bringing pressure, this wasn’t a great look for the offense as the QB had to rush his throw, but you can see the space that is there for the post corner route.
As you can see, “Saints” was a great, simple play for Oregon, the Eagles, and the 49ers. There is a variety of different ways in which you can get to this concept, it works well against most coverages, and has a simple, consistent progression for the QB. I’d expect this concept to be a staple of both UCLA’s and Nebraska’s offense this upcoming season.
If you have any questions or comments regarding the article, you can contact me by email at TaylorKolste@gmail.com or on Twitter at @TaylorKolste.

Great article, I love this concept. Thank you!
LikeLike