
By Taylor Kolste
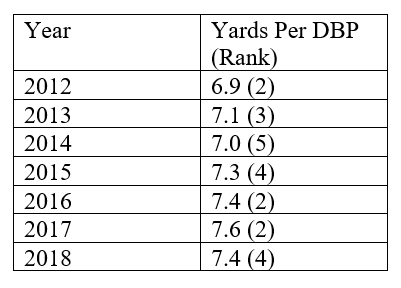
Throughout the Brees-Payton era in New Orleans, the Saints have consistently finished as one of the top passing offenses in the NFL. Since 2012, the Saints have finished as one of the top 5 drop-back passing offenses in the NFL each season (in terms of yards per play).
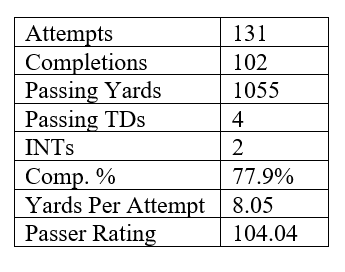
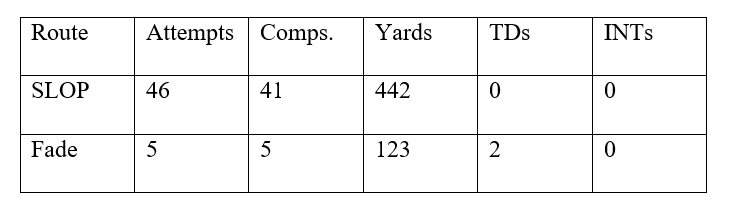
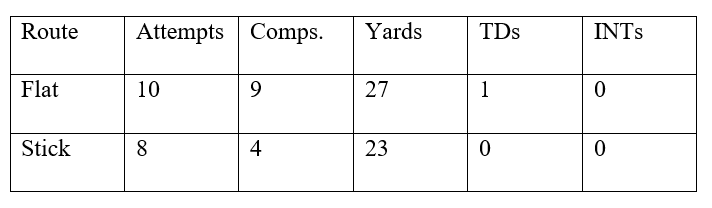
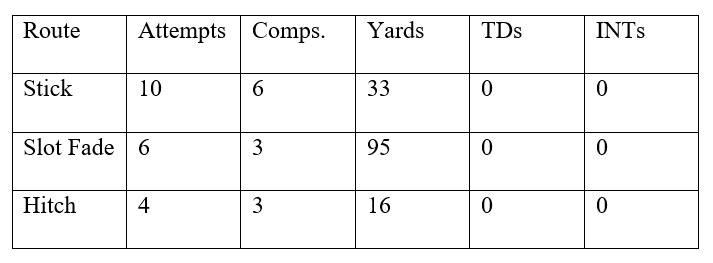
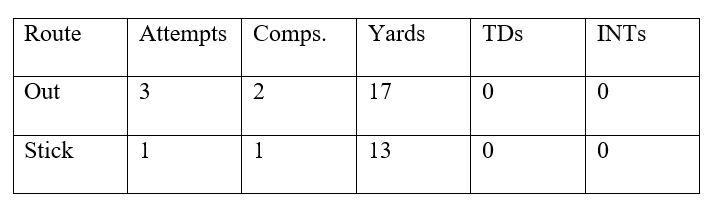
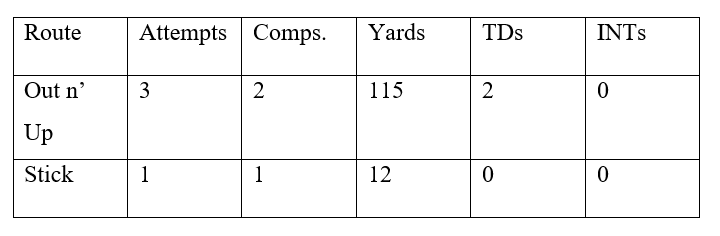
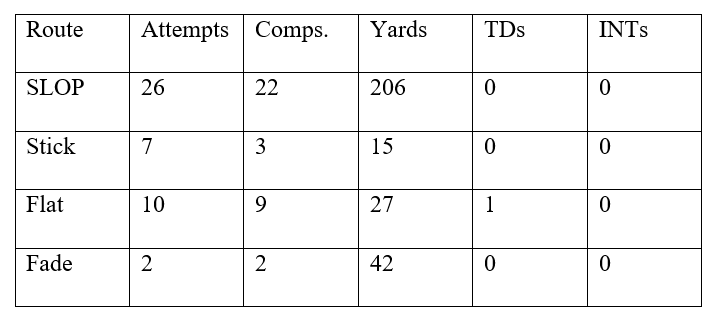
While much of this success needs to be accredited to Drew Brees and other great players that the Saints have had over this period, their scheme has done a good job of maximizing the talent they have had over the years. A staple of Saints passing game over the years has been the Stick-Option concept. Below shows the combined statistics for their variations of this concept over the last 3 seasons (all of the stats from this article are based on the 2016-2018 seasons):

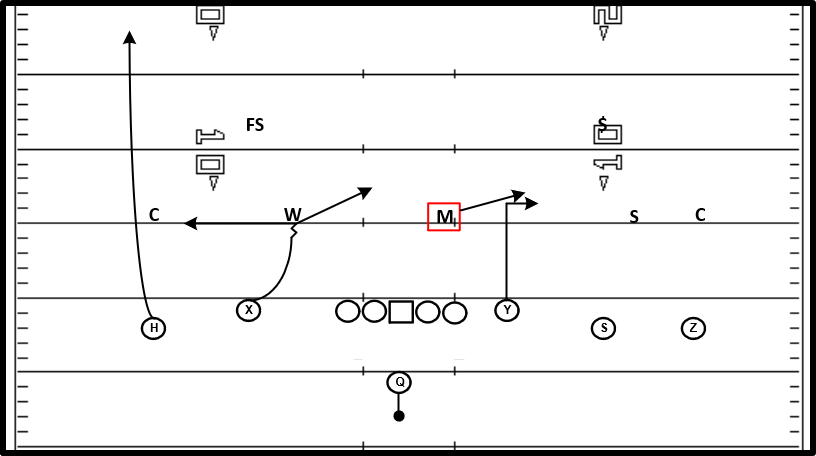
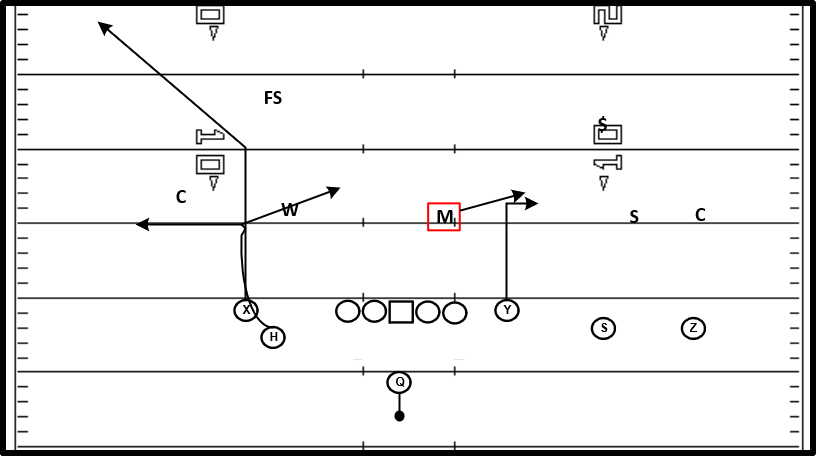
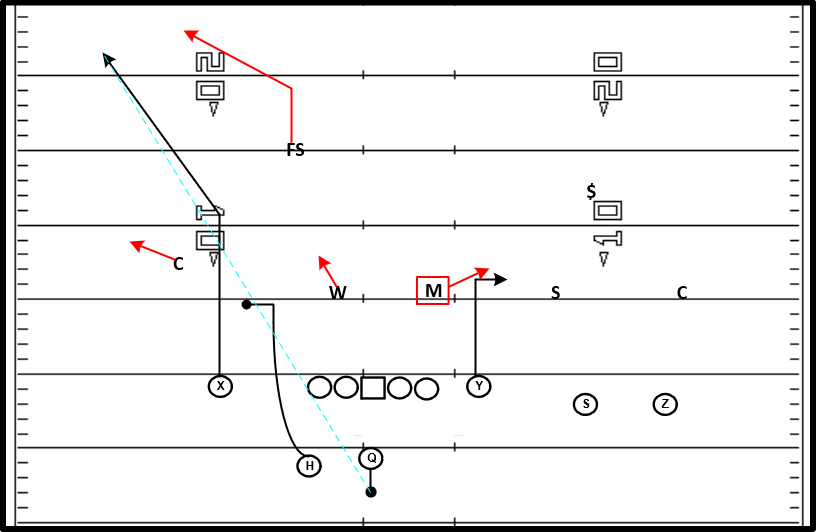
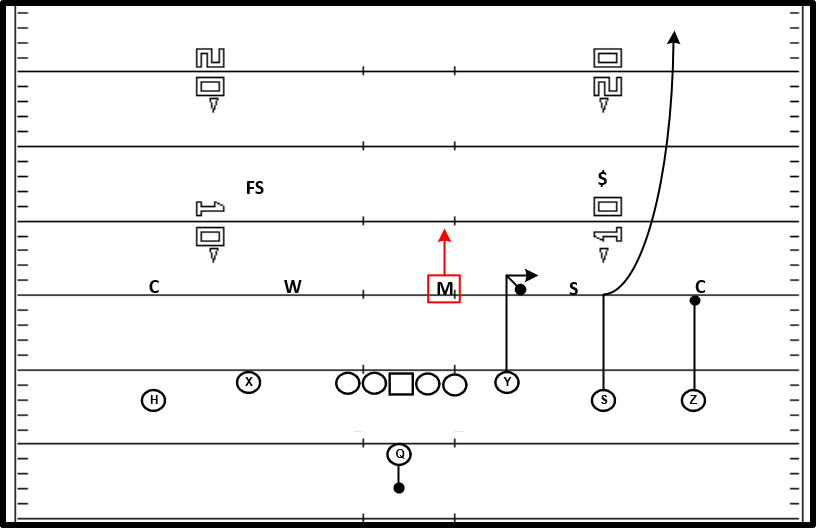
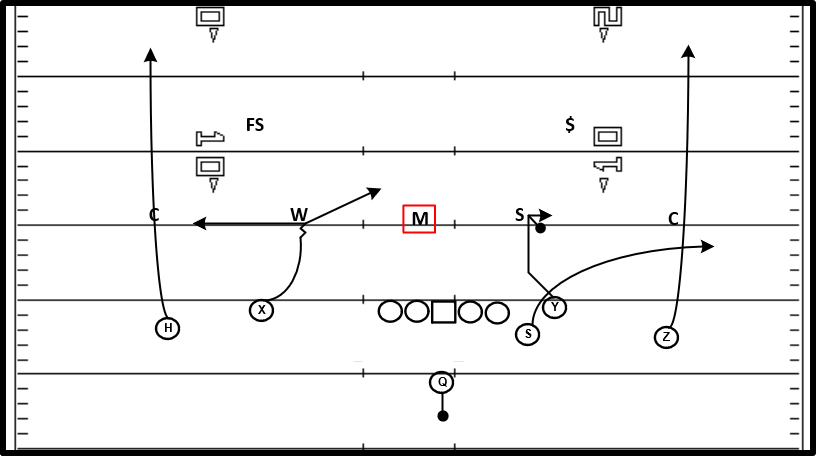
This article will go over the different variations of this concept that the Saints have used over the past 3 seasons. Below shows the basic structure of these concepts:

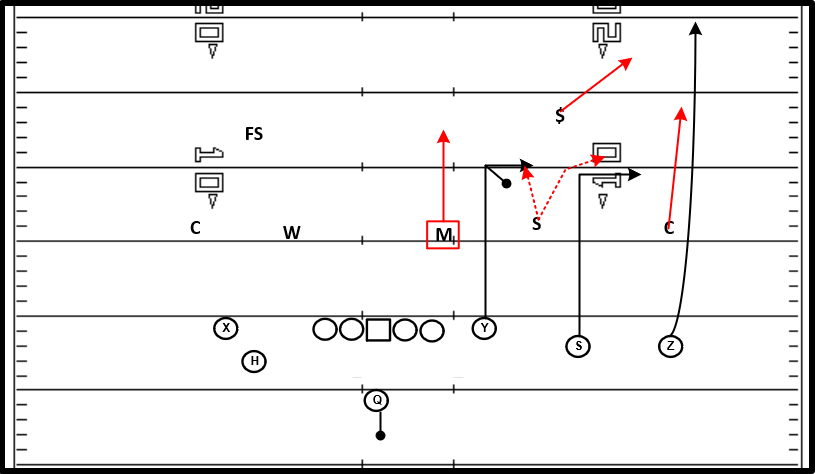
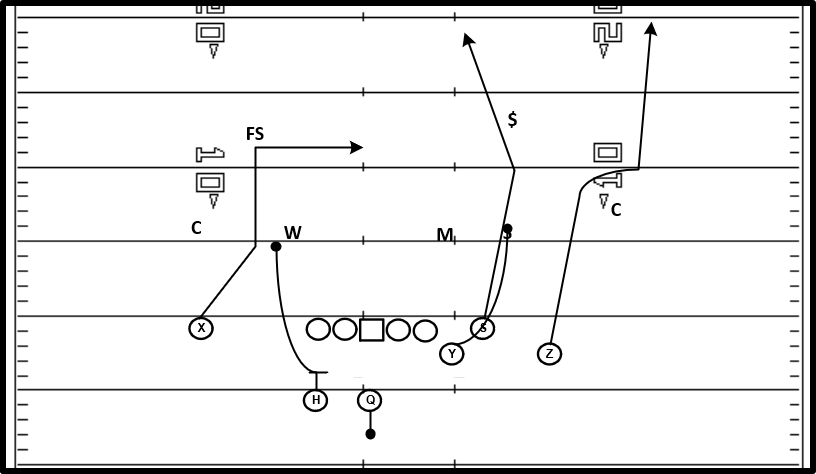
Each of these concepts involves a “stick” concept to the 3-receiver side with a backside option route ran off of the WILL by either a slot receiver or running back. The frontside “stick” concepts that the Saints used each consisted of a stick route (essentially an out-route where the receiver can hook-up out of the break if in space) ran at either 6 or 10 yards with a high-low combination to the outside. These concepts are designed primarily to attack two-high defenses. Versus two-high coverages, the quarterback will key the MIKE linebacker’s movement and work the concept opposite of his movement. If the MIKE matches the stick route to the frontside, the middle of the field is opened up isolating the slot or running back’s 2-way go-option route off the WILL. If the MIKE takes a straight drop and does not match the stick route, the stick concept should be able to provide the quarterback with an open target.
I will first go through the different variations of the backside option route that the Saints used, then the frontside stick concepts, and finish by showing the different ways in which the Saints combined these to create full-field concepts.
Backside Tags (The statistics are from only when the backside concept was thrown):
* This concept was better for the Saints when the MIKE matched the frontside stick route and they were able to work the backside option concept.
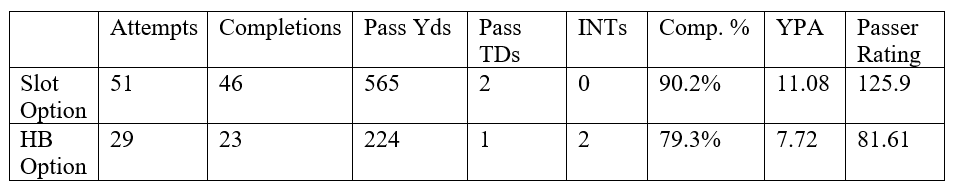
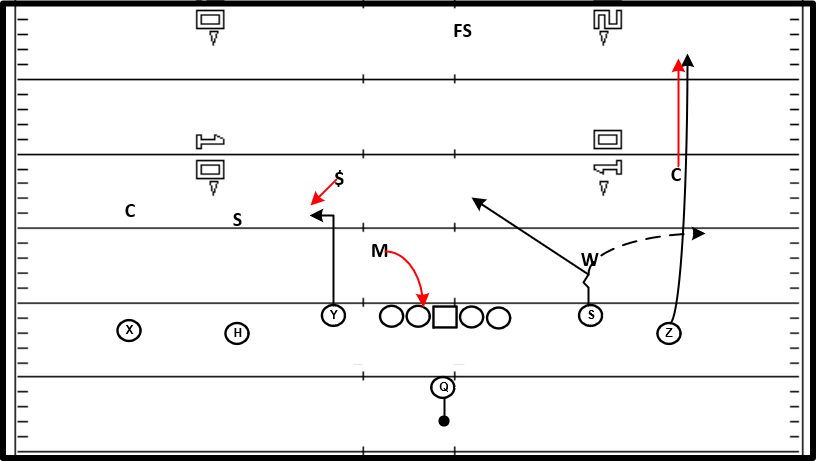
- Slot Option:
Hit Chart:
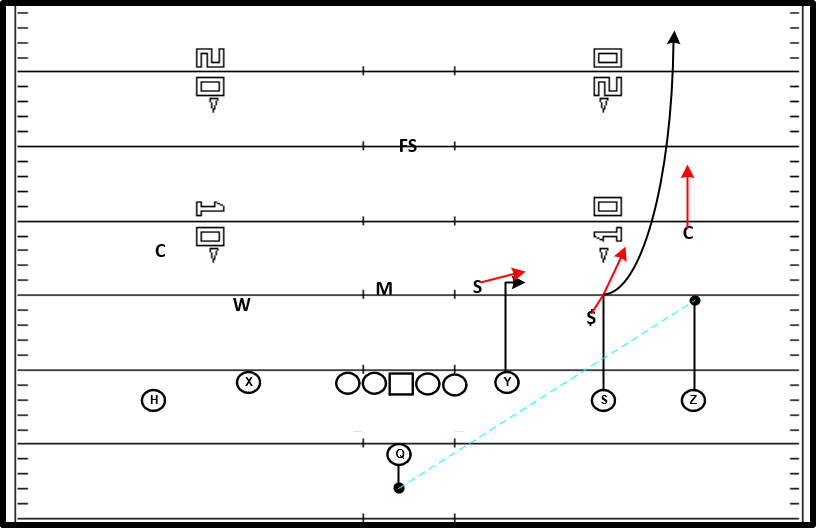
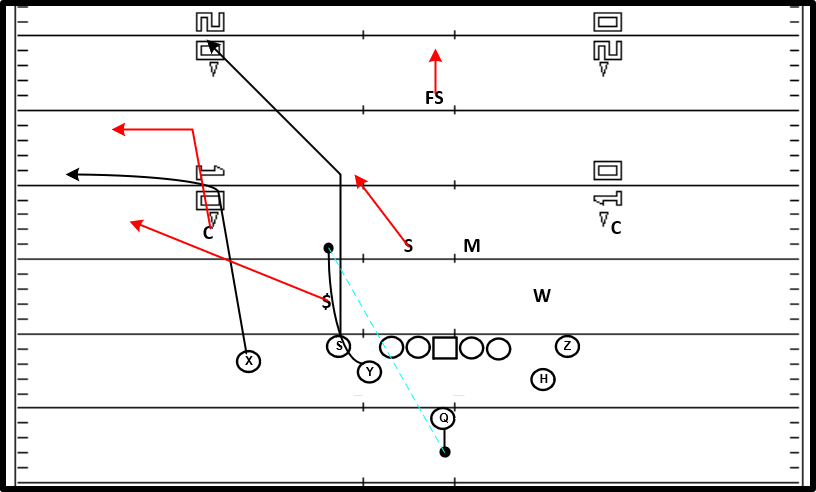
The backside slot option concept was ran from both base splits and condensed splits, though more often from base splits. When ran from their base splits, the #1 receiver runs a fade route. When ran from condensed splits, the #1 receiver runs a 10-yard corner. The receiver running this route (the Saints normally used Michael Thomas in this role) ideally wants to cross the WILL’s face and work into the middle of the field. If the quarterback is working this concept, this means that the MIKE matched the frontside stick route opening up the middle for the backside option route. If the WILL is aligned head-up with the backside slot, the slot should break-in nearly every time. As the slot receiver approaches the defender, he will fire his feet to come under balance before giving a head-fake to the outside, and sticking with his outside foot to break in.
If the WILL is aligned with inside-leverage on the slot, the receiver will stem inside towards the WILL’s alignment. If he can get head-up on this defender, he will again foot-fire and stick with his outside foot to cross the WILL’s face into the vacated middle.
If the WILL slides inside to wall-off the slot, then he will stick with his inside foot and break out towards the sideline.
If the slot receiver breaks out towards the sideline, the quarterback just has to be aware of the positioning of the corner back. If the corner tries to cut the out-breaking route, a window should be opened up to throw the outside fade into the hole between the corner and the safety.
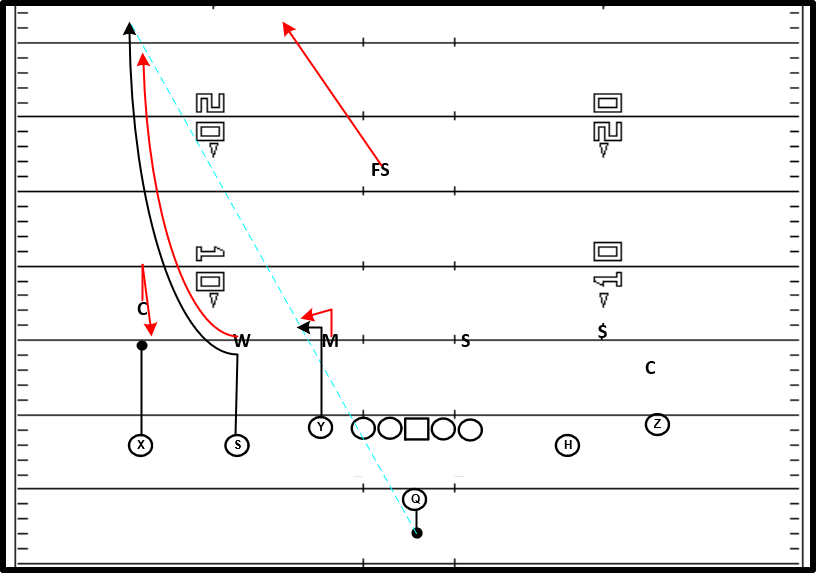
When the option route is ran from a condensed alignment, the slot receiver will initially stem outside (regardless of the WILL’s alignment). If the WILL follows his stem outside, the receiver should be able to beat him back to the inside.
Often times when the route is ran from this alignment, the WILL stays tucked inside the box and does not widen with with the receiver’s stem. If this is the case, the receiver will just turn outside and sit to prevent himself from running into the corner.
Although this concept is primarily designed to beat two-high coverages, it is also effective against cover 1 when the defense pressures with 5. Because there is no low-hole player, the slot still has an isolated 2-way go off the WILL.
Since the WILL does not have low-hole help to his inside, it is likely that he will play head-up on the slot. As was mentioned before, the slot receiver will more often than not break inside against this alignment.
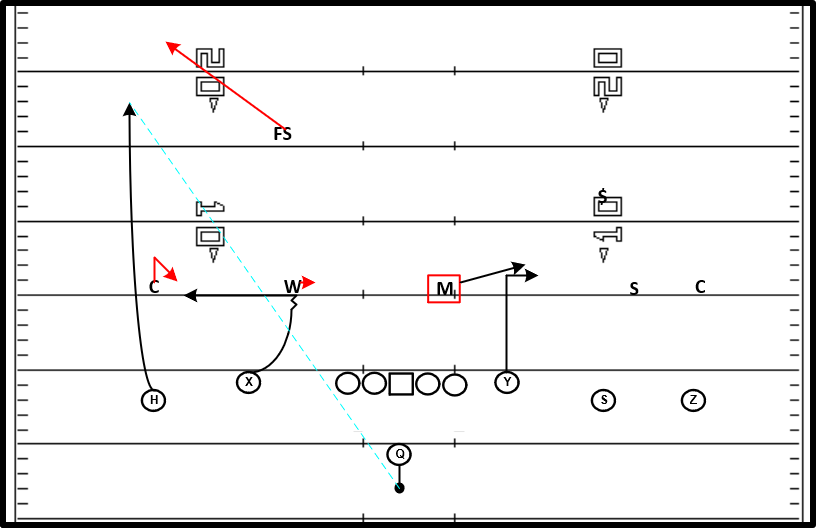
If the defense plays man coverage with either a low-hole player or with a bracket on the backside slot receiver (on the play below, the defense does both), the 1 on 1 is now to the outside fade route (the Saints also had an answer to this with one of their frontside stick concepts that I will get to soon). The Saints only threw this route once over the past 3 seasons against cover 1, but the result was a 37-yard touchdown pass to Alvin Kamara.
The backside slot option concept is worst against cover 3 as there is no isolated defender for the slot to work off of, but is still workable. The slot will look to hook up in-between the flat and hook defenders. Versus cover 3, the quarterback generally worked the frontside concept, however, Brees has gone backside to the option route against cover 3 a few times over the past 3 seasons (in single-high coverages, there are now two inside-linebackers, negating the QB’s ability to work away from the MIKE.)
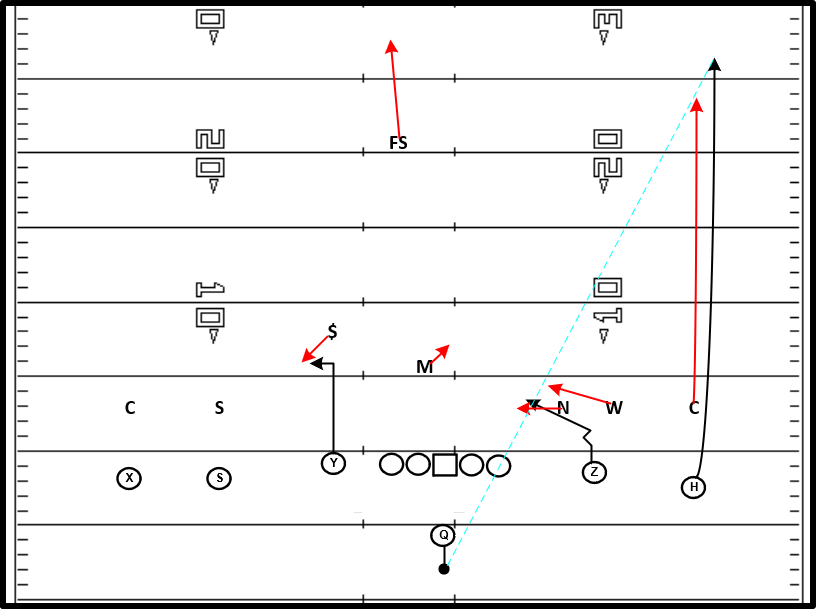
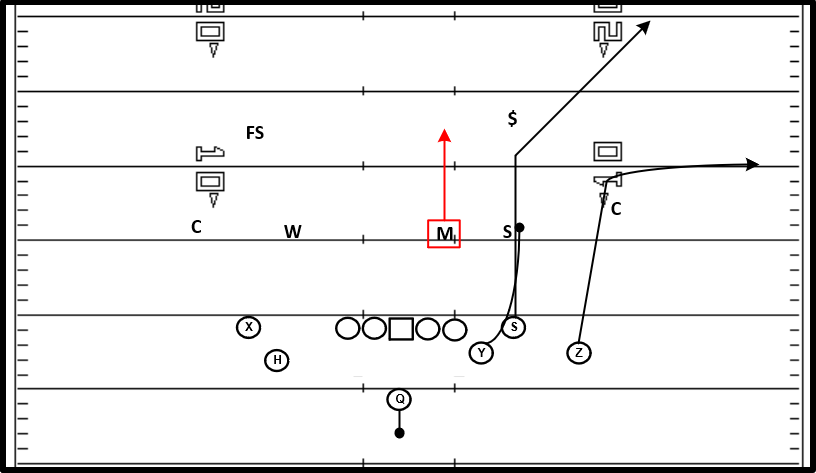
- HB Option:
Hit Chart:
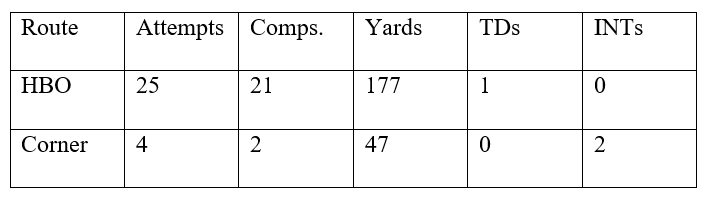
The HB option route is essentially the same option route, just ran from the backfield now. It is very similar to the slot option route ran from a condensed alignment. If the WILL widens with the HB’s outside release from the backfield, the HB should be able to beat him across his face into the middle of the field. However, this did not happen very often. More often than not, the HB was forced to break outside on his option route, likely explaining why the Saints were less efficient with their HB option route in comparison to their slot option route.
If the WILL widens with the back but maintains his inside leverage, the HB should be able to beat him to the sideline.
As was the case with the option route ran from a condensed alignment, if the WILL stays tucked into the box and does not match the back’s release at all, the HB will just sit in-between the WILL and CB.
If the corner back sits on the out-breaking route by the HB (given that the WILL played inside), the quarterback can throw the corner route to the #1 receiver over the top of the corner back. Because of his alignment, the receiver should have outside leverage on the safety and be able to beat him to the sideline on his corner route. Although not discussed earlier, this is also true for when the slot option route is ran from a condensed alignment.
Frontside Stick Concepts (The statistics are from only when the frontside concept was thrown):
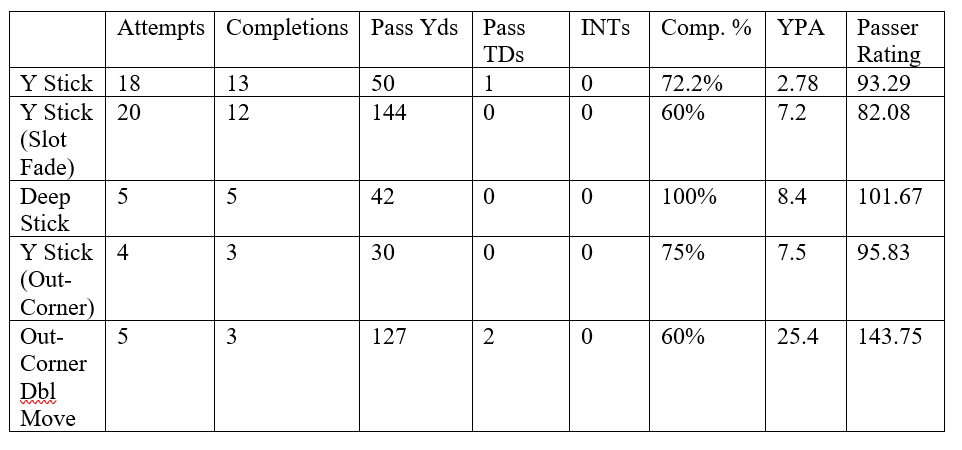
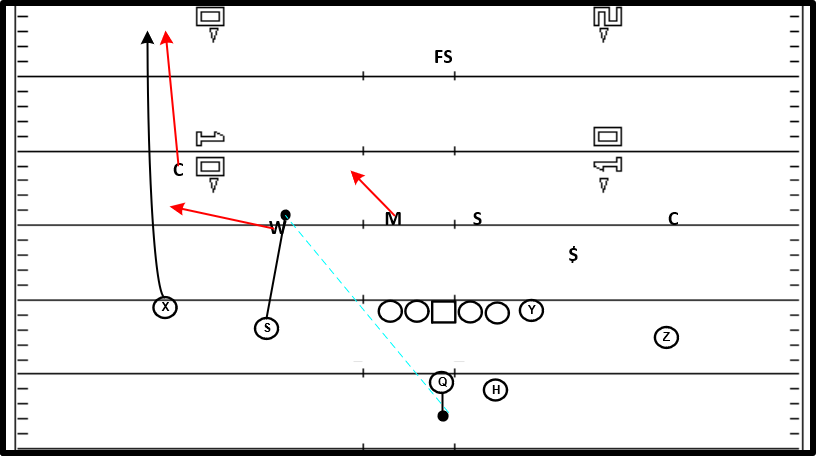
- Y Stick:
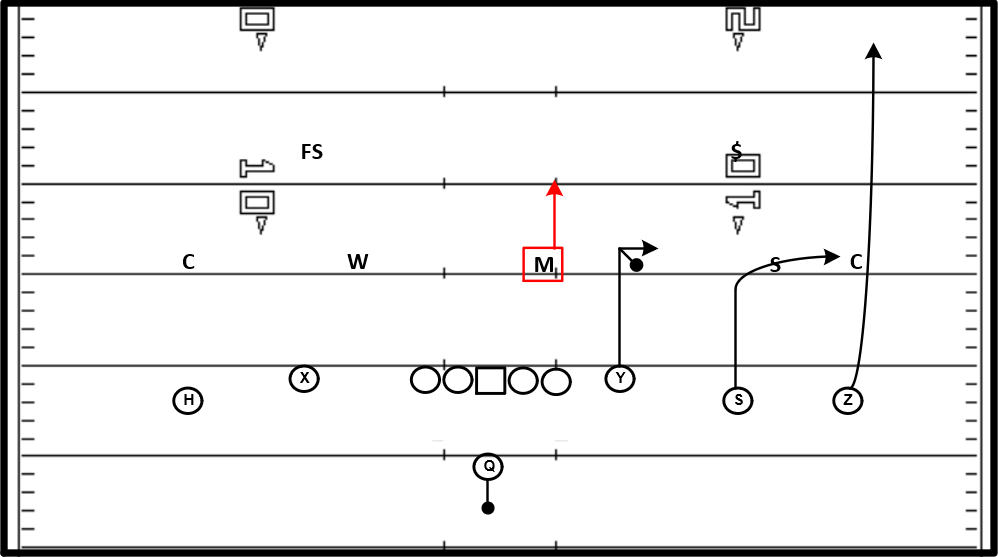
Diagram 1
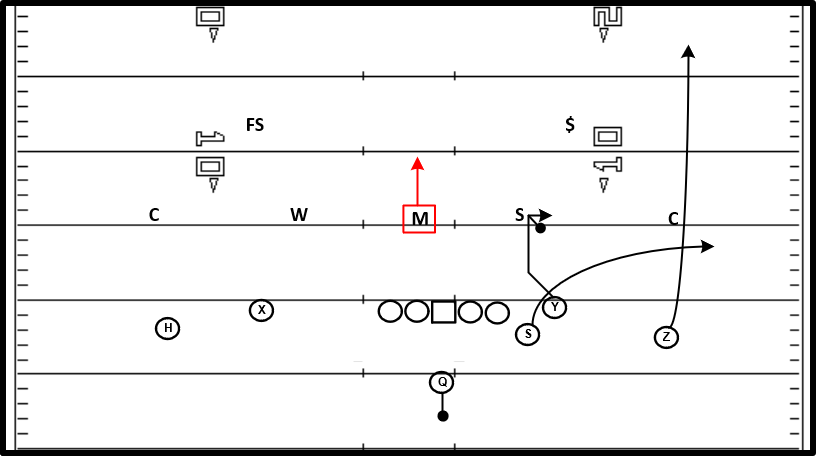
Diagram 2
![]()
Diagram 3
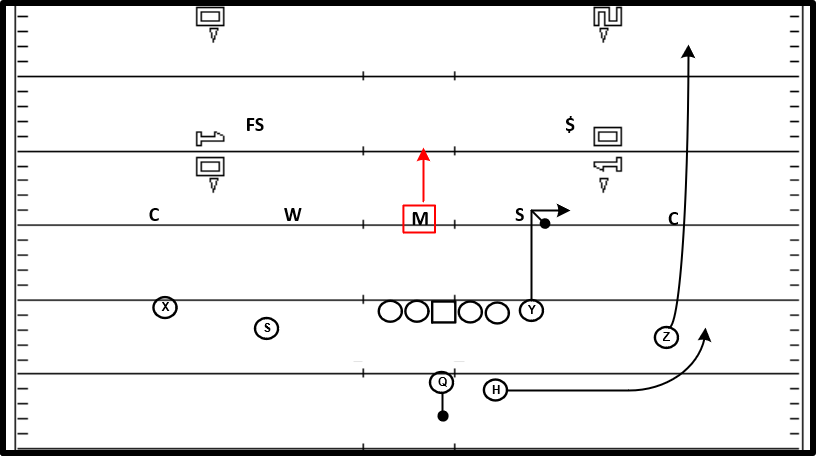
Diagram 4
Hit Chart:
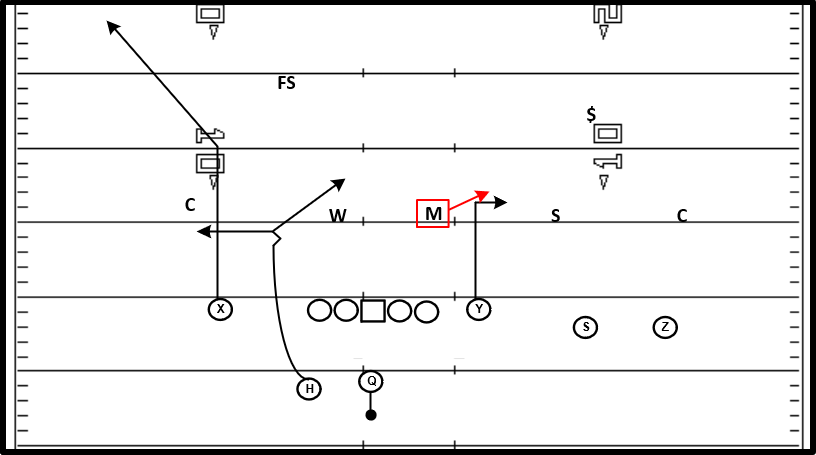
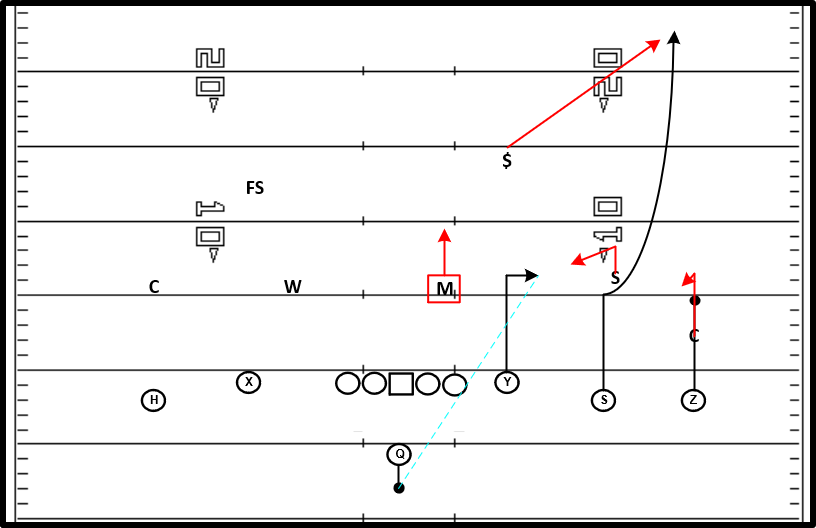
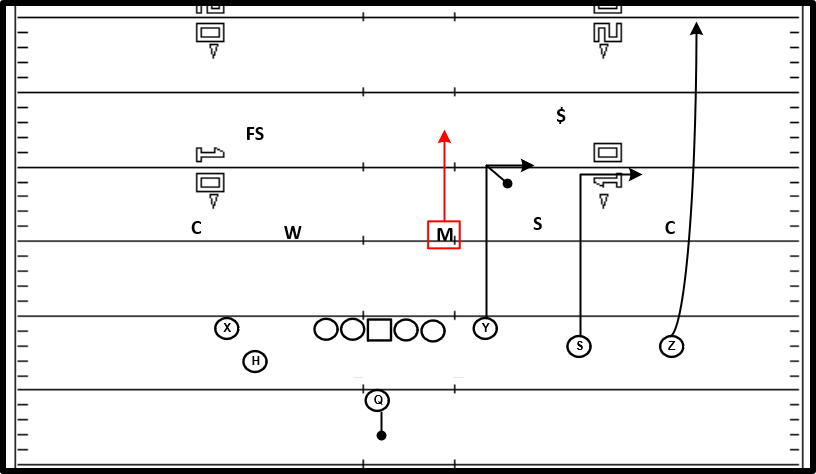
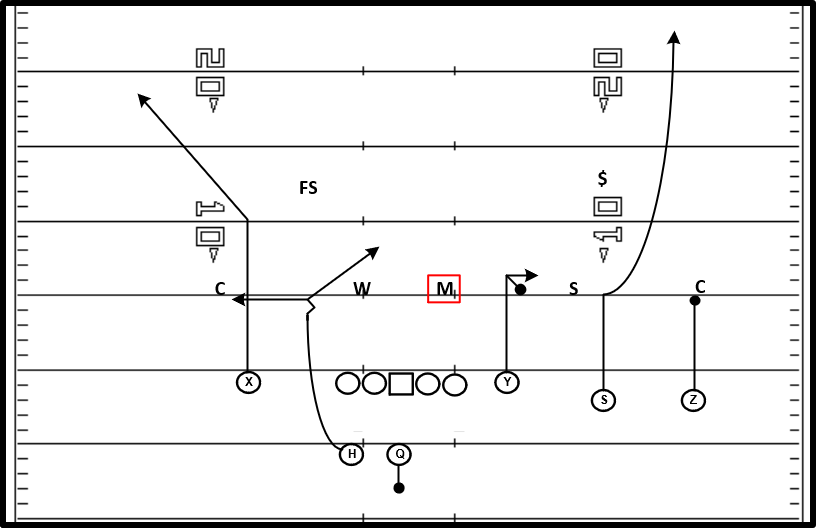
This was the Saints most commonly used frontside concept (although it was not the most thrown frontside concept). In this variation, the tight end will always run the stick route at 6 yards and the outside receiver will always run a fade, providing the high route in the high-low. When ran from a 3-receiver surface, the #2 receiver will run a 5-yard speed out (Diagram 1). When ran from a condensed 3-receiver set, the #3 receiver will run an arrow, and the #2 receiver will run the stick route (Diagram 2). When ran from a 2×2 set with the tight end detached, the running back will run a shoot route (Diagram 3). When ran from 2×2 with the tight end inline, the running back will run a swing route (Diagram 4).
If the MIKE takes a straight drop and does not match the tight end’s stick route, the offense should, in theory, have a 2 on 1 horizontal stretch on the SAM. If the SAM is widened by the flat route, the stick route should open up in-between the SAM and MIKE.
If the SAM squeezes the stick route, the quarterback should throw the ball to his receiver in the flat.
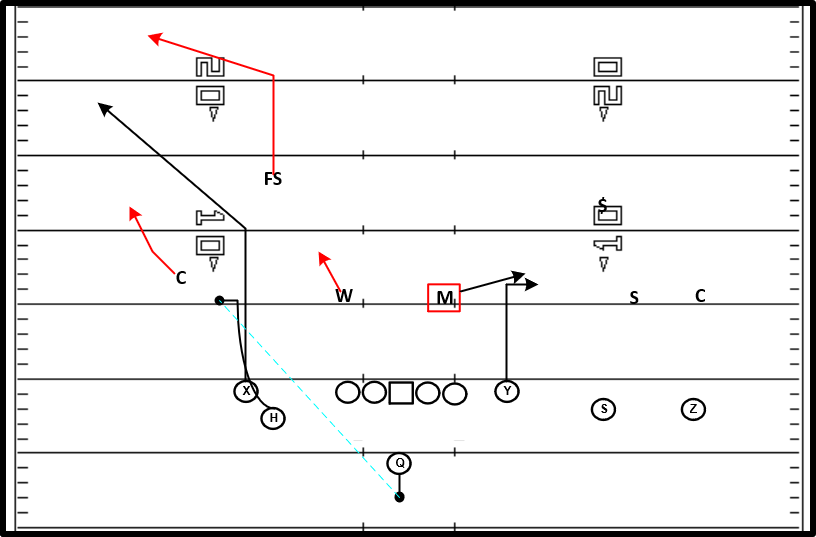
(* On the play shown below, the MIKE’s drop should’ve told the QB to work his backside option route, but he might have seen the pre-snap leverage that the #2 receiver had on the SAM.)
As I’ve mentioned before, this concept is primarily designed to beat two-high coverages and is not great against cover 3, however the offense is not completely sunk against this coverage. The flat route should remove the flat defender allowing the tight end to work away from the hook defender on his stick route. This should normally allow the offense to pick up 5 on the stick route if they are able to complete it. As will be shown next, the Saints had 2 variations of their stick concept that were primarily designed to give the offense better options against cover 3.
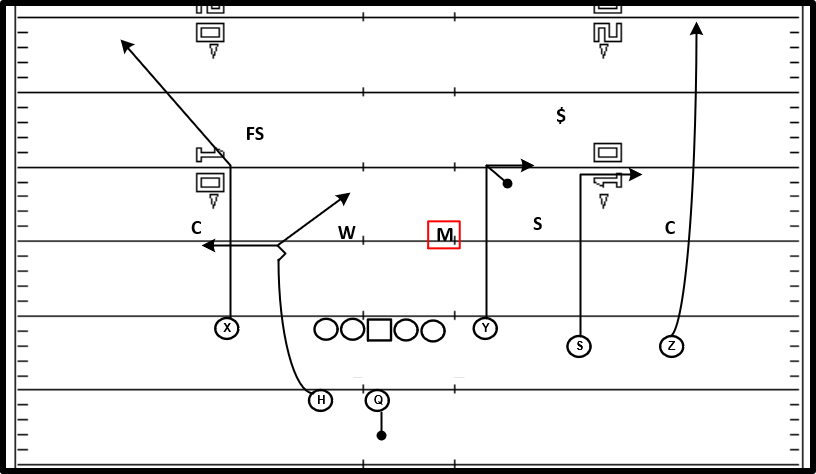
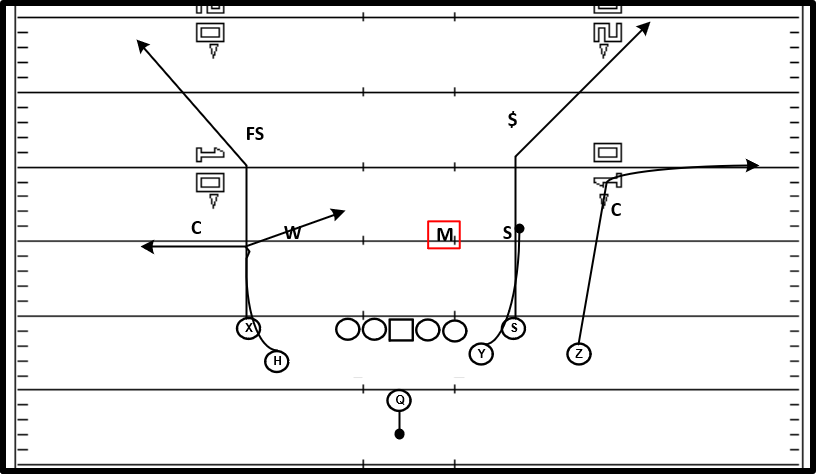
- Y Stick (Slot Fade):
Hit Chart:
This version of stick was always ran from a 3-receiver surface. The #3 receiver will still run the stick route, but the Saints will now use a hitch-fade combo on the outside as the high-low combination. This provides the Saints with solid answers to both cover 3 and cover 1. Against cover 3, the vertical release of the #2 receiver should hold the flat defender, leaving the hitch open against a soft corner.
Against cover 1, the slot fade generally provides the offense with a higher percentage throw than the fade route to the backside due to the space available to the sideline for the quarterback to throw the ball into.
This concept works similarly to the previous stick concept shown against two-high coverages, however the window to throw the stick route may be tighter on this concept as the offense does not have a receiver working to the flat to pull the SAM.
- Deep Stick:
Hit Chart:

This concept is very similar to the first stick concept shown, except now the stick and out routes are ran at 10 yards. This concept stresses zone coverages similarly to the first stick concept shown, but allows the offense to pick up a few more yards when throwing the stick or out route.
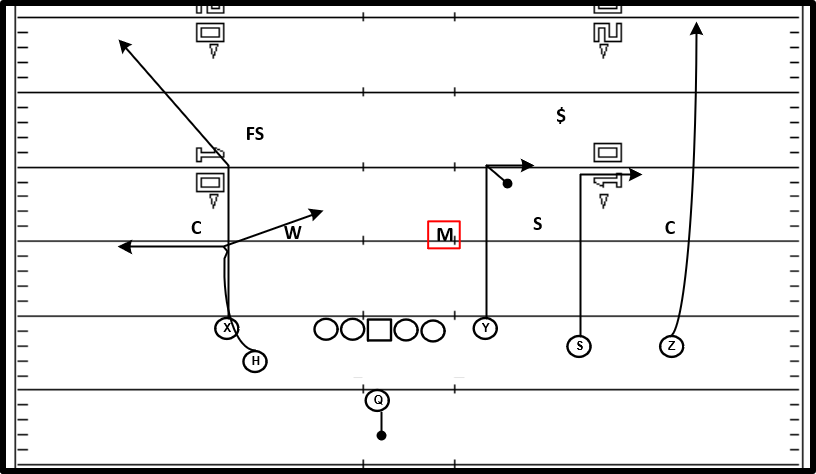
- Y Stick (Out-Corner):
Hit Chart:
This concept also provides the Saints with a better option to defeat cover 3 in comparison to their base stick concept. The #1 receiver will stem outside towards the numbers and run a 10-yard speed out. The #2 receiver will run a corner route, and the tight end will outside release to a 6-yard inside-turn stick route. This concept is unique in comparison to the Saints’ other stick concepts in that it appears the quarterback will only read away from the MIKE if there is a cloud corner to the 3-receiver side. If the corner is off, the quarterback will look to throw the speed out as his first read. This often becomes a high-percentage free-access throw to the sideline for the quarterback.
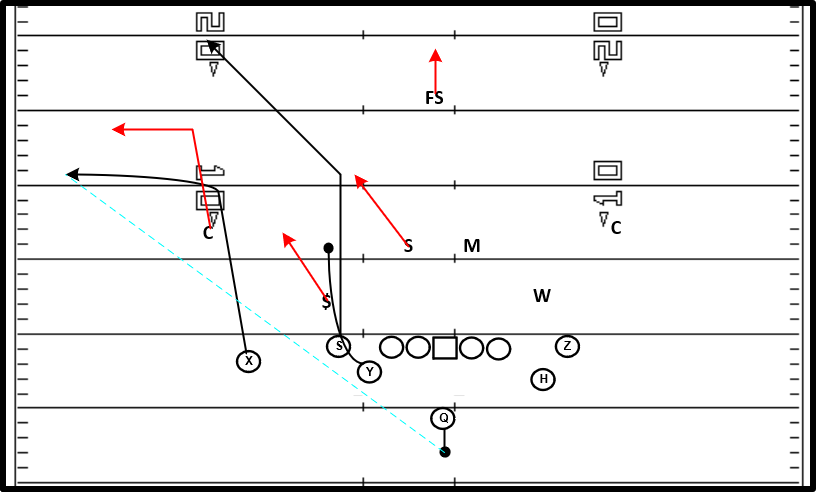
If the flat defender gets underneath of the speed out, the quarterback will come down to the stick route.
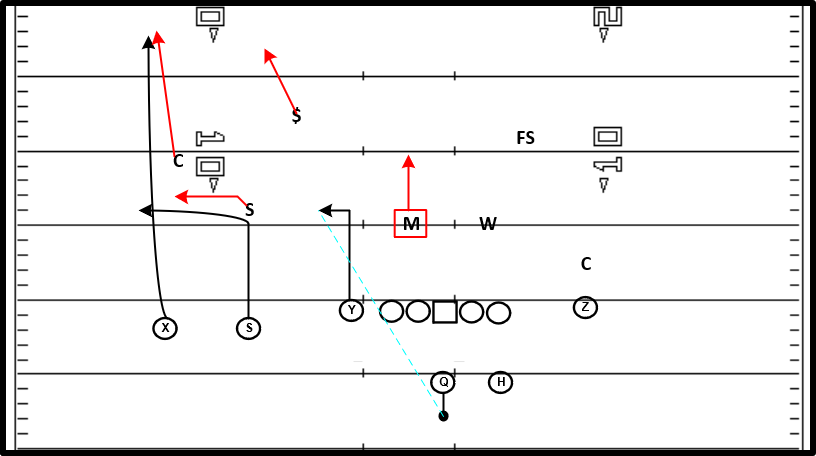
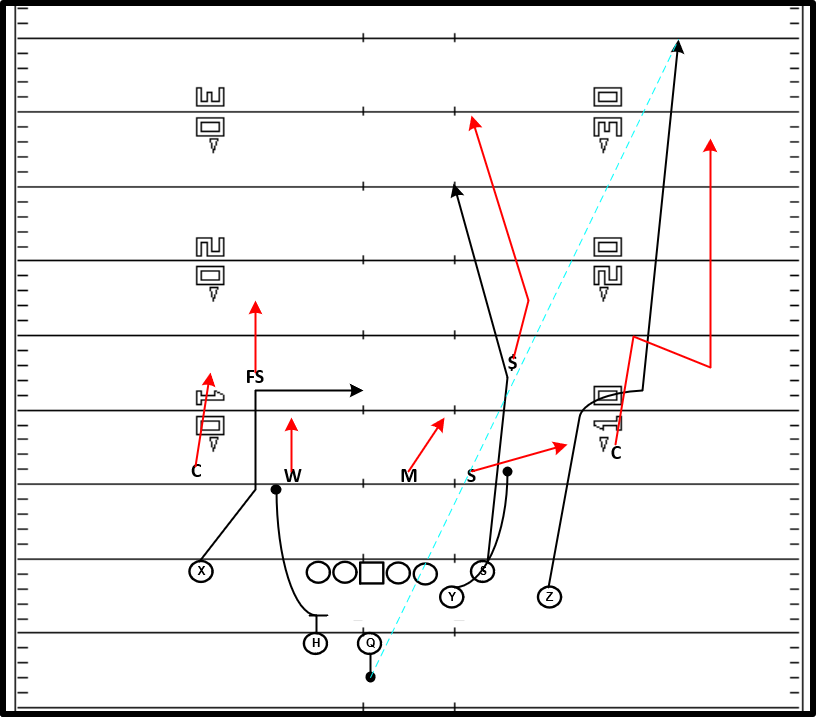
- Out-Corner Double Move (* This is not a stick-option concept, but is worth including because it works off of the previous stick concept)
Hit Chart:
This concept plays off of the stems of the previous stick concept shown. The #1 receiver will stem outside and break out towards the sideline at 10 yards as he would on his speed out. He will take 3 steps to the sideline and then break back up the field. If the corner is off, ideally he should break inside of the corner as this defender is coming downhill to break on the first move. The #2 receiver will now run a seam route to occupy the safety. The Saints would use a Dig from the single receiver with a check-release hook route from the back underneath of it. The quarterback will look to the out n’ up first, and then will work back to his dig-hook combo if the receiver running the double move is not able to win. Although the sample size is limited, this was a very explosive concept for the Saints when called.
Full-Field Combinations:
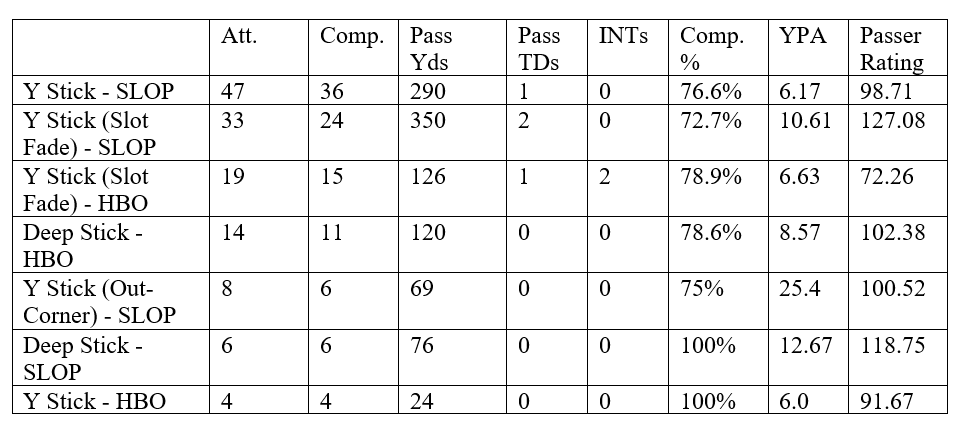
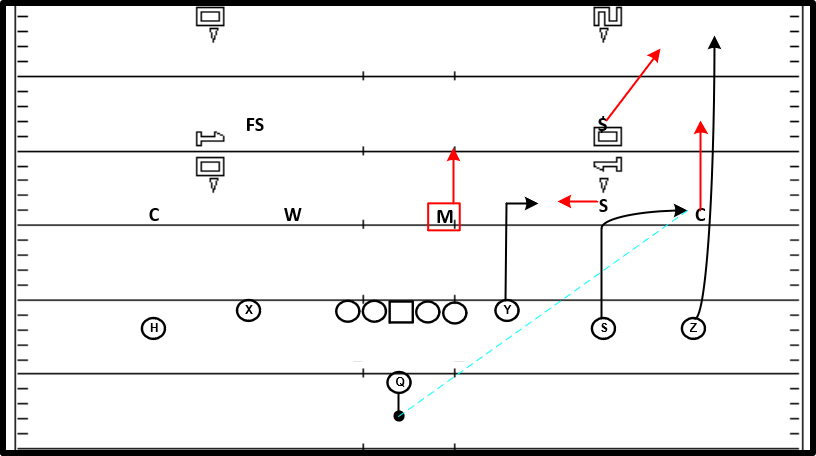
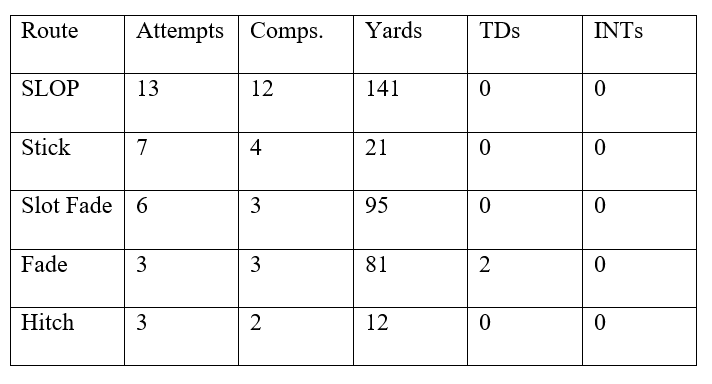
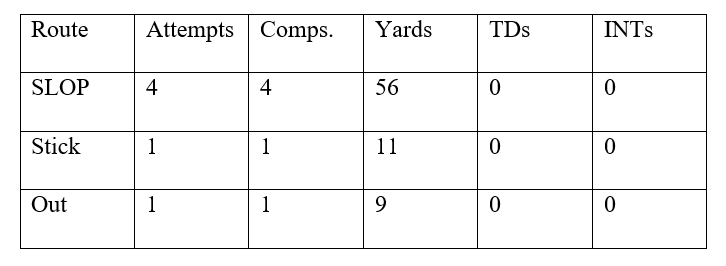
- Y Stick – SLOP


![]()
Hit Chart:
- Y Stick (Slot Fade) – SLOP
Hit Chart:
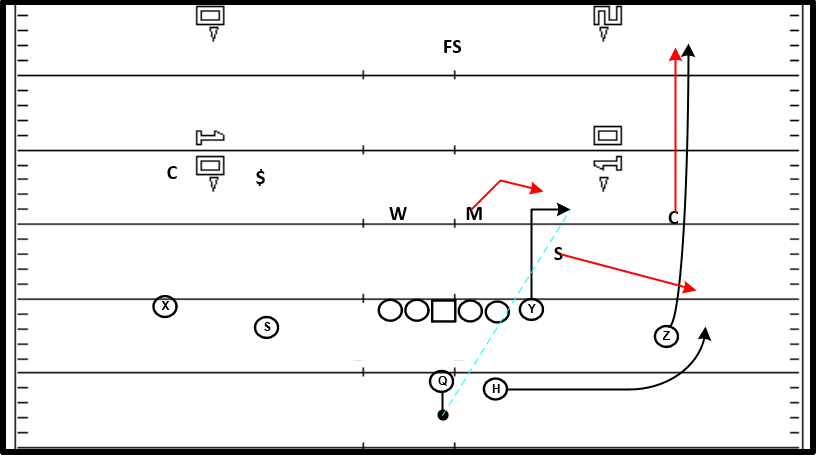
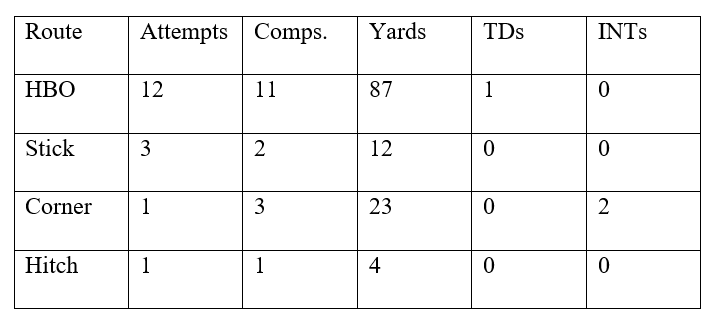
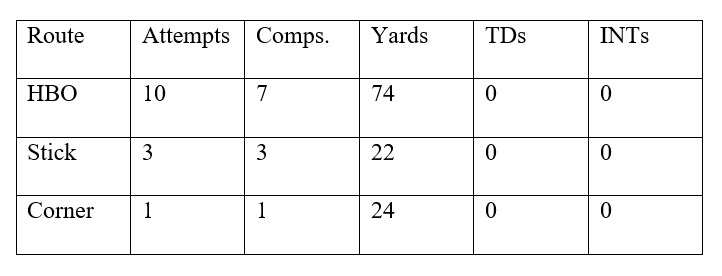
- Y Stick (Slot Fade) – HBO
Hit Chart:
- Deep Stick – HBO
Hit Chart:
- Y Stick (Out-Corner) – SLOP
Hit Chart:

- Deep Stick – SLOP
Hit Chart:
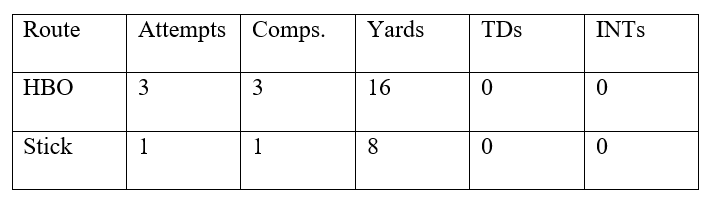
- Y Stick – HBO

Hit Chart:
If anybody has any questions, or feedback on how future articles can be better, you can contact me via Twitter at @TaylorKolste or via email at TaylorKolste@gmail.com.

One thought on “The New Orleans Saints’ Stick-Option Concept”